Design your own elliptic crinoline
Autor: Xaljira
1. Determine the basic shape of your crinoline. In my case it is a half circle in the front and a long oval in the back, looking something like this

This is basically a bird view of half of one hoop. The front part of this crinoline will be easy because it’s just a half-circle and won’t require much calculation. The oval part however is more challenging. But more to that in a moment. First we need another drawing.
This is a profile picture of the skirt. My crinoline will have a bell shape in front and a more tempered shape in the back. To hold the shape of such a large skirt I need quite a lot of hoops, so I drew in 10 of them. You can use less but keep in mind, the rounder you want the resulting shape and the bigger the crinoline is supposed to become, the more hoops you will need.
To make the crinoline we now need to calculate two things:
a) the circumference of each hoop
b) the length of the ribbons which will hold the hoops together.
a) Circumferences
We will start with the lowest hoop. I decided that my skirt should have a diameter of 3 Meters lenghtwise and 2 Meters to the square. I then drew an outline of this to scale. So we’re back to the first picture:
Because the front of the skirt is circular, r1 and r2 are the same length and part one of the circumference (U1) can be calculated with the formula for circles (2*Pi*r) divided by four: ½*Pi*r1 So, for this hoop that would be in numbers: ½*3,14*100cm = 157cm
So we now know the circumference (U1) from front seam to the side seem is 157cm
The second part of the circumference (U2) can’t be calculated in one because it is oval. So instead I broke it up into parts (you might remember this from school ^.^) by drawing in lines perpendicular to r3 (h1-h9) So, instead of calculating a curve we’re going to calculate straight lines. In my picture these lines are called s1 – s9.
To calculate these we’re using the formulas for triangles with a right angle: a2+b2=c2.
Let’s use s8 as an example. S8 lies between the two lines h7 and h8. The three sides of the triangle are determined as follows:
a= the difference between h8 and h7
b= the distance from between the h-lines which is always the same (i)
s8 is calculated using the formula: s8=√(a2+b2) or s8=√[(h8-h7)2 + i2]
Determining the length of h7 and h8 is why I drew the picture to scale. So to determine the actual length of h7 (for example) I measure the length of the line on paper and multiply it by the scale factor. In my case the scale is 1:11,11 so I simply have to multiply the measurement by 11,11.
So, the calculation in numbers is S8=√[(48,89-66,67)2 + 22,222] = 28,46cm
Once this step is repeated for s1 to s9 we can then calculate U2
U2= s1 + s2 + s3 + s4 + s5 + s6 + s7 + s8 + s9
After this Utotal is U1+U2*2.
Phew, we’ve got the circumference of one hoop. Take a breather because now we need to repeat all this for the other 10 hoops :D
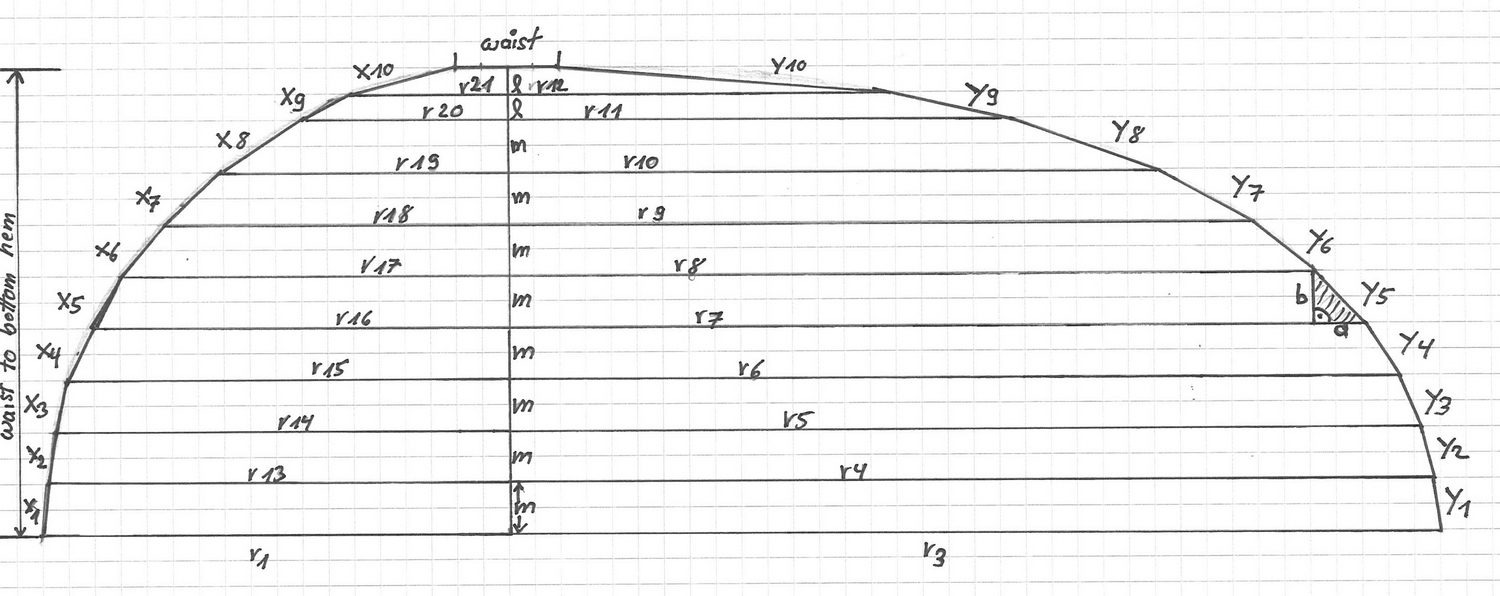
As the calculations for the circumference are based on the radius of the hoop, this is what we’ll have to determine first. For this we need drawing Nr. 2
R3 is the lowest hoop, that we’ve just been calculating with. Above that in regular intervals of m and l I’ve drawn in the other hoops. I could have drawn them all with the same space in between but then the curve at the top of the skirt would have been all too steep.
To determine the length of any radius simply measure it out and multiply with the scale of the drawing. For each hoop you need two measurements the one for the front circle and the one for the oval shape of the back.
With these two measurements we’re going back to our first drawing.
R3 is now r4 and r1 is now r13 which changes the scale of this drawing. So before we do anything further we calculate the new scale. In my case every cm on paper is now 11cm in reality.
Now repeat everything you did for the first hoop ad infinitum. ^.^
b) the length of the ribbons connecting the hoops
To connect all the hoops together you will need ribbons. How many depends on the size of the crinoline, but I’d suggest a minimum of eight: center front, side fronts, sides, side backs and center back. To calculate that let’s have a look again at picture Nr. 2
What we see in the picture is actually the center front and the center back line. These can be calculated just like the pieces of the hoops (s). So once again we break the curve up into several straight lines. That’s then y1 – y10 for the center back ribbon and x1 to x10 for the center front ribbon.
Let’s use y5 as the example. To calculate y5 we need r7 and r8 as well as m. Once again y5 is the hypothenuse of the resulting triangle, thus giving us the formula:
t5=√[(r7-r8)2 + m2]
This same way you can calculate all the ys and all the xs. When you calculate the xs together you get the necessary length of the ribbon, on which you can then mark x1 – x10 so you know where to attatch each hoop. Same with the center back (y).
Now you have the measurements for the center front and center back ribbon. Because my crinoline is cicular in the front the measurements for the side front and side are the same as for the center front. Unfortunately, this is not the case for the side back ribbons. Those can’t be calculated, they will have to be guessed when assembling the crinoline.
So, basically you cut and mark the center front ribbon five times and the center back ribbon once.
When you cut the hoops make sure to mark the placement of the ribbons on the hoops accordingly:
Center front is the end of the ribbon
Side front is half of U1
Side is U1
Side back is U1 + ½ Stotal
Center back is U1 + Stotal
Once you’ve done all the cutting and marking (Make sure to number EVERYTHING so you still know what goes where in the end) you’re ready to assemble your very own crinoline. You might have to tweek the shape a little once everything is toghether as we’ve calculated a lot of the distances only approximately, but you should get a pretty good start with this method.
Sooooo, have fun calculating and if you try this, please let me know how it turned out and should you have any questions because my explanations suck do ask me and I’ll try to explain more clearly. ^.^